Authentication
Ditto does not come with an identity provider. Using "Online With Authentication" requires that you have your own identity provider already set up. Each app can use multiple identity providers.
The "Online With Authentication" identity type is geared towards apps that will be deployed in real world settings. "Online With Authentication" identity types are:
- for apps that need to integrate with existing permissions
- for apps that need to integrate with existing authentication systems
How it works
caution
Devices using Online with Authentication need to connect to the Internet and authenticate at least once before synchronizing with other peers. This is required so devices can get a valid certificate before going offline.
To use the "Online With Authentication" system, your client application is expected to authenticate with your identity system and retrieve some sort of token prior to syncing with Ditto. Often times this token is some sort of identity token, access token, commonly in the format of a JWT (JSON Web Token).
Once your client application successfully has retrieved this token, it should pass it to the Ditto authenticator which will pass it to an authentication webhook. As the developer, you are responsible for writing code and deploying the this webhook to an accessible URL. The authentication webhook will validate and decode the token from the client side and return identity and access control information back to your Ditto instance.
The full flow is detailed in the diagram below:
API
To see fully working examples, see the code samples on GitHub.
Creating your client
Create the ditto client with the onlineWithAuthentication identity. This
identity requires an authentication handler authHandler.
warning
You must refresh the auth token when it expires. You can do that by implementing
authenticationExpiringSoon. If you do not implement this, then sync will stop when the token
expires.
const authHandler = {  authenticationRequired: async function(authenticator) {    console.log("Login request.");  },  authenticationExpiringSoon: function(authenticator, secondsRemaining) {    console.log(`Auth token expiring in ${secondsRemaining} seconds`)  }}  }
const identity = {  type: 'onlineWithAuthentication',  appID: 'REPLACE_ME_WITH_YOUR_APP_ID',  authHandler}
const ditto = new Ditto(identity, '/persistence/file/path')ditto.startSync()struct AuthDelegate: DittoAuthenticationDelegate { func authenticationRequired(authenticator: DittoAuthenticator) { print("Login request.") }
func authenticationExpiringSoon(authenticator: DittoAuthenticator, secondsRemaining: Int64) { print("Auth token expiring in \(secondsRemaining)") }}
let identity = DittoIdentity.onlineWithAuthentication( appID: "REPLACE_ME_WITH_YOUR_APP_ID", authenticationDelegate: AuthDelegate())
let ditto = Ditto(identity: identity)try! ditto.startSync()class AuthCallback: DittoAuthenticationCallback { override fun authenticationRequired(authenticator: DittoAuthenticator) { println("Login request.") }
override fun authenticationExpiringSoon( authenticator: DittoAuthenticator, secondsRemaining: Long ) { println("Auth token expiring in $secondsRemaining seconds") }}
val androidDependencies = AndroidDittoDependencies(context)val identity = DittoIdentity.OnlineWithAuthentication( androidDependencies, "REPLACE_ME_WITH_YOUR_APP_ID", AuthCallback())val ditto = Ditto(androidDependencies, identity)try { ditto.startSync()} catch(e: DittoError) { Log.e("Ditto error", e.message!!)}
class AuthCallback implements DittoAuthenticationCallback {    @Override    public void authenticationRequired(@NonNull DittoAuthenticator authenticator) {        System.out.println("Login request.");    }
    @Override    public void authenticationExpiringSoon(@NonNull DittoAuthenticator authenticator, long secondsRemaining) {        System.out.println("Auth token expiring in " + secondsRemaining + " seconds");    }}
DittoDependencies androidDependencies = new DefaultAndroidDittoDependencies(this.context);DittoIdentity identity = new DittoIdentity.OnlineWithAuthentication(    customDirDependencies,    "REPLACE_ME_WITH_YOUR_APP_ID",    new AuthCallback());Ditto ditto = new Ditto(androidDependencies);
try { ditto.startSync();} catch(DittoError e) { Log.e("Ditto Error", e.getMessage())}class AuthDelegate : IDittoAuthenticationDelegate{ public async void AuthenticationRequired(DittoAuthenticator authenticator) { System.Console.WriteLine($"Login request"); }
public async void AuthenticationExpiringSoon(DittoAuthenticator authenticator, long secondsRemaining) { System.Console.WriteLine($"Auth token expiring in {secondsRemaining} seconds"); }}
var identity = DittoIdentity.OnlineWithAuthentication( "REPLACE_ME_WITH_YOUR_APP_ID", new AuthDelegate());
try{ var ditto = new Ditto(identity); ditto.StartSync();}catch (DittoException ex){ System.Console.WriteLine($"Ditto Error {ex.Message}");}class AuthCallback: public AuthenticationCallback {public: void authentication_required(std::shared_ptr<Authenticator> authenticator) { std::cout << "Login request" << std::endl; }
void authentication_expiring_soon(std::shared_ptr<Authenticator> authenticator, std::int64_t seconds_remaining) { std::cout << "Auth token expiring in " << seconds_remaining << " seconds" << std::endl; }};
Identity identity = Identity::OnlineWithAuthentication( "REPLACE_ME_WITH_YOUR_APP_ID", std::make_shared<AuthCallback>());try { Ditto ditto = Ditto(identity, "/your-persistence-path"); ditto.try_start_sync();} catch (const DittoError &err) { std::cout << err.what() << std::endl;}use dittolive_ditto::prelude::*;use std::sync::Arc;use std::time::Duration;
struct AuthHandler { token: String, provider: String,}
impl DittoAuthenticationEventHandler for AuthHandler { fn authentication_required(&self, auth: dittolive_ditto::auth::DittoAuthenticator) { ::log::info!("Login request."); }
fn authentication_expiring_soon( &self, _auth: dittolive_ditto::auth::DittoAuthenticator, seconds_remaining: std::time::Duration, ) { ::log::info!( "Auth token expiring in {} seconds", seconds_remaining.as_secs() ); }}
impl Default for AuthHandler { fn default() -> Self { AuthHandler { token: ThirdPartyAuth::get_token(), provider: String::from("my-auth"), } }}
let mut ditto = Ditto::builder() // creates a `ditto_data` folder in the directory containing the executing process .with_root(Arc::new(PersistentRoot::current_exe()?)) .with_identity(|ditto_root| { // Provided as an env var, may also be provided as hardcoded string let app_id = AppId::from_env("DITTO_APP_ID")?; let auth_event_handler = AuthHandler::default(); let enable_cloud_sync = true; let custom_auth_url = None; // return the Result<Identity, _> at the end of this closure OnlineWithAuthentication::new( ditto_root, app_id, auth_event_handler, enable_cloud_sync, custom_auth_url, ) }) .with_transport_config(|_identity| { let mut config = TransportConfig::enable_all_peer_to_peer() }) .build()?;
ditto.try_start_sync()?;Login
Login takes two parameters: the first is token. The token can be any string
value. Most auth services use a JWT (JSON Web Token), but you
can send any token you want from the client. For example, during testing you
may want to create a secret code for development
use. This string will be sent in a POST request to the HTTP route.

await ditto.auth.login(accessToken, 'my-auth')ditto.auth.login(accessToken, provider: "my-auth") { clientInfo, err in print("Login request completed. Error? \(err)")}ditto.auth.login(accessToken, "my-auth", err -> { System.out.println("Login request completed. Error? " + err.toString());});ditto.auth.login(accessToken, "my-auth", (clientInfo, err) -> { System.out.println("Login request completed. Error? " + err.toString());});var res = await authenticator.Login(accessToken, "my-auth");System.Console.WriteLine($"Login request completed. Error? {res}");authenticator->login("123", "my-auth", [](std::unique_ptr<DittoError> err) { std::cout << "Login request completed. Error?" << err->what() << std::endl;});auth.login_with_token(accessToken, &self.provider) { ::log::info!("Login request completed. Error? {:?}", &e);}curl -X DELETE 'https://{app_id}.cloud.ditto.live/api/v1/collections/people/documents/<doc_id>' \ --header 'X-DITTO-CLIENT-ID: AAAAAAAAAAAAAAAAAAAABQ==' \ --header 'Content-Type: application/json' When should you call ditto.auth.login?
If you have already implemented the callbacks mentioned earlier, you don't need to take further action. Ditto will automatically attempt to refresh whenever possible. However, if you know specific times when the app will be online, you may choose to call this function manually.
For an example implementation of authentication for Android, see the Ditto open-source demo chat app's "authentication" branch in the getditto GitHub repository.
Logout
Logout will stop sync, shut down all replication sessions, and remove any cached
authentication credentials. Note that this does not remove any data from the
store. If you wish to delete data from the store then use the optional
cleanupFn parameter to perform any required cleanup.
The cleanupFn is an optional function that will be called with the relevant Ditto
instance as the sole argument that allows you to perform any required cleanup of
the store as part of the logout process.
async function cleanupFn (ditto) { await ditto.store.collection('cars').findAll().evict()}await ditto.auth.logout(cleanupFn)ditto.auth.logout(cleanup: { ditto in ditto.store.collection("cars").findAll().evict()}) ditto.auth.logout(ditto -> { ditto.store.collection("cars").findAll().evict(); })ditto.Auth.Logout((Ditto ditto) =>{ ditto.Store.Collection("cars").FindAll().evict();});ditto.auth.logout({ ditto.store.collection("cars").findAll().evict();})ditto.auth.logout(|ditto| { ditto.store().collection("cars")?.find_all().evict()?;});Tutorial
This section will require knowledge of writing server side HTTP endpoints and handlers. The server side sample code is written in JavaScript (NodeJS with an Express-like API), however you can use any framework or language of your choosing.
We will use Auth0 in this tutorial. But you can use any third-party identity provider. Each app can use multiple identity providers.
In this tutorial, you'll build a simple application so users can log in with a a third-party provider using Auth0. We assume that you have already completed the Auth0 tutorial on their documentation before starting this tutorial.
For the full application code in JavaScript and Swift, see the code samples on GitHub.
Configure Ditto
To use an "Online With Authentication" identity, go to your app in the portal and find the Authentication Mode & Webhook Settings section. Ensure that "With Authentication" is selected like so:
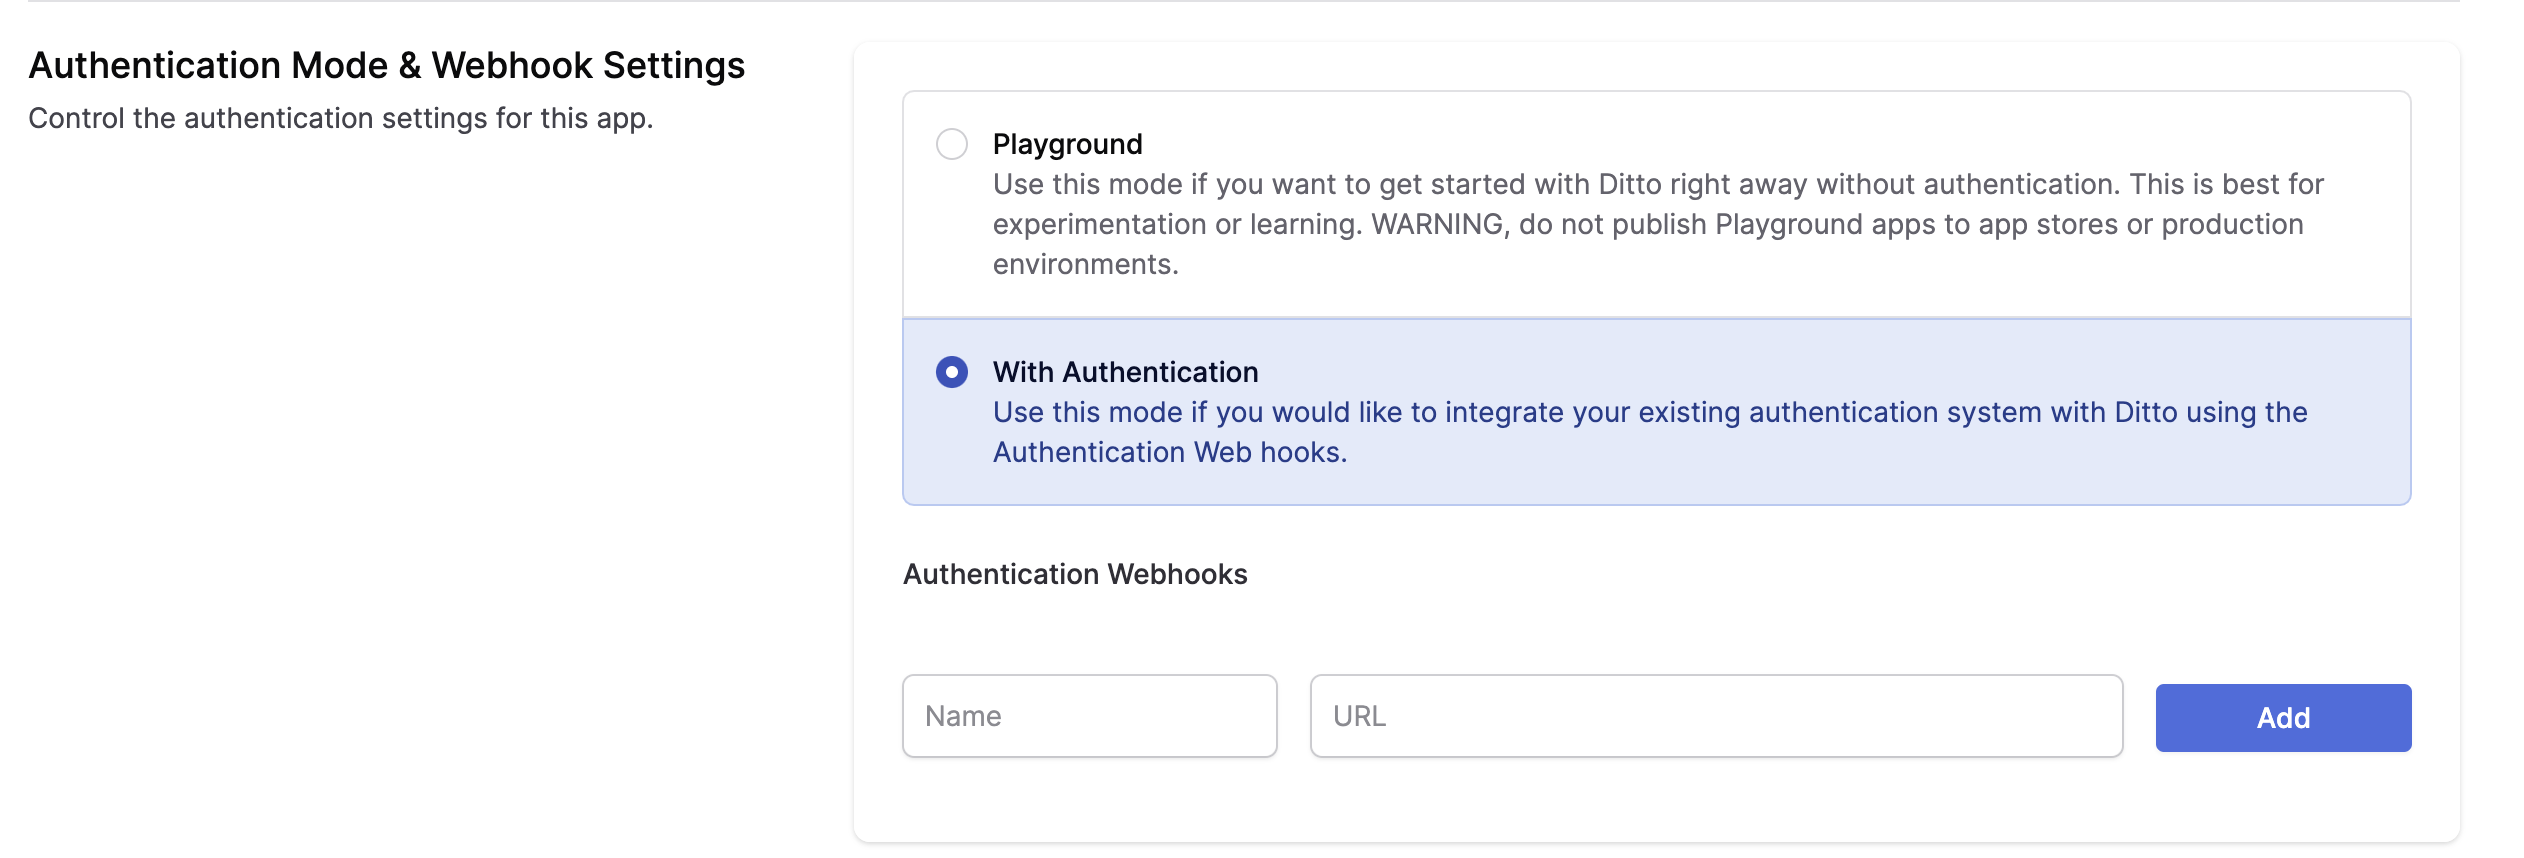
Below, a section called Authentication Webhooks will be editable. Once your Authentication Webhook Endpoint(s) is deployed and ready, you can register it in the portal. Add a Name and URL.
- Provide a unique Name to identify your authentication webhooks.
- The URL parameter is the fully qualified URL of the webhook that you deploy yourself. Please include https:// at the beginning of your URL.
You can use our example webhook to just get started. This webhook is a server deployed on a third-party server and is just for testing. This server will always authorize all clients with full read and write permissions.
You can use this URL to test your application. However, you should not use this URL in production. This Replit simply authenticates everyone for 7 days of offline usage.
Once configured, you should see a webhook that looks like this in your portal app settings:

Configure Auth0
The second step is to configure Auth0. Follow these steps:
- Create a new Auth0 application.
- Configure the allowed callbacks and origins for your application. Make sure to add the callback URL for your application.
- Configure the allowed grant types for your application. For this tutorial, we will use the "Authorization Code" grant type.
- Create a new API in Auth0. This will represent the API that your application will access.
Next, you need to configure Ditto. Follow the steps that were outlined earlier in this article.
Now that you have configured Auth0 and Ditto, you can start integrating them into your application.
If you already have an Auth0 account...
...log in, skip the next section, and proceed to the part titled Register your app with Auth0.
If you don't have an Auth0 account yet...
...you can sign up for one here - it's free.
Register your app with Auth0
- In the menu on the left side of the Auth0 dashboard, click on Applications:
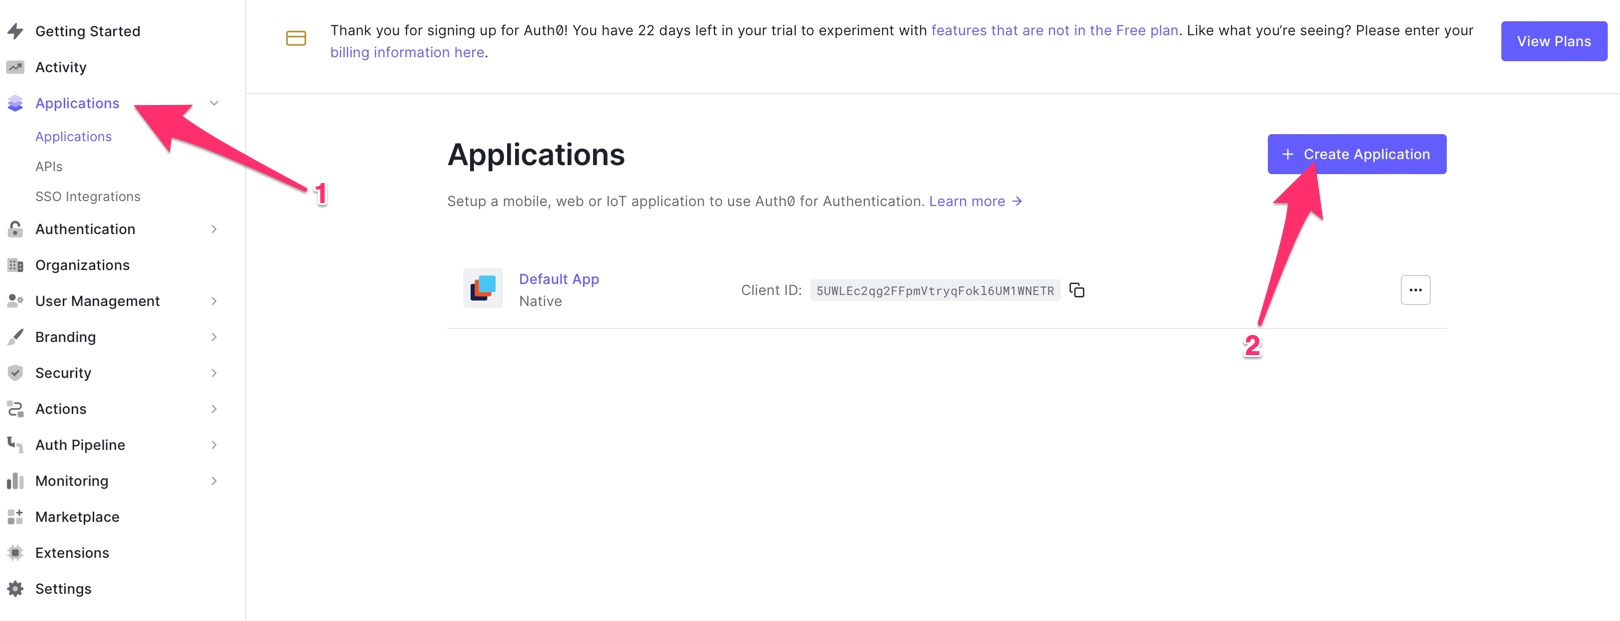
This will expand the Applications menu. Select the first item in that menu, which also has the name Applications.
You will now be on the Applications page. It lists all the applications that you have registered so that Auth0 can handle their login/logout processes.
- Create a new registration for your app. Do this by clicking the Create application button near the top right of the page
You can follow the prompts and instructions on the Auth0 site for more details. From the Auth0 portal you will need to retrieve the following information for your Android app:
Domain
Client ID
You can store these as String resources in your app. On the Auth0 portal, you will need to build your callback URL and logout URL. Again, see the Auth0 website for details on how to do this.
References
Auth0 Website - Android Getting Started / Onboarding
Integrating Auth0 with Ditto
Assuming you have a login button in the HTML:
<button onClick={login}>Login</button>We attach a login function to the button.
import createAuth0Client from '@auth0/auth0-spa-js';// OR for Reactimport { useAuth0 } from '@auth0/auth0-react';
// configure your auth0 client...
async function login () { await auth0.loginWithRedirect({ redirect_uri: window.location.origin }); startDitto()}We can then create a startDitto function that gets the access token and starts a
new Ditto instance, and passes the token to your server route you created in the previous section.
info
The provider name given to the Ditto Client must match a provider name in the Portal (e.g., replit-auth).
import createAuth0Client from '@auth0/auth0-spa-js';// OR for Reactimport { useAuth0 } from '@auth0/auth0-react';import { init, Ditto } from "@dittolive/ditto"
// configure your auth0 client...
let ditto
(async () => {  await init() // you need to call this at least once before using any of the Ditto API
  function startDitto () {    let token = await auth0.getAccessTokenSilently();
    const authHandler = {      authenticationRequired: async function(authenticator) {        await authenticator.login(token, "replit-auth");        console.log("Login request completed.");      },      authenticationExpiringSoon: function(authenticator, secondsRemaining) {        console.log(`Auth token expiring in ${secondsRemaining} seconds`)        await authenticator.login(token, "replit-auth");        console.log("Login request completed.");      }    }        const identity = {      type: 'onlineWithAuthentication',      appID: 'REPLACE_ME_WITH_YOUR_APP_ID',      authHandler    }        ditto = new Ditto(identity, '/persistence/file/path')    ditto.startSync()  }
async function login () { await auth0.loginWithRedirect({ redirect_uri: window.location.origin }); startDitto() }})()To demonstrate that this Ditto client has been authenticated, let's display the number of cars in the collection, and a button to add one item to it:
<div> <h1>Cars: {numberOfCars}</h1> <button onClick={addItem}>+1</button></div>Once we start the ditto instance, we can create a liveQuery and create a
button that adds items to a collection:
let subscription = ditto.store.collection('cars').find("state == 'FOR_SALE'").subscribe()let liveQuery = ditto.store.collection('cars').find("name == 'Toyota'").observeLocal((cars) => {  numberOfCars = cars.length})
function addItem () { ditto.store.collection('cars').upsert({ "name": 'Toyota', "state": 'FOR_SALE' })}Log out
let loggedIn = falseif (auth0.isAuthenticated()) { loggedIn = true}if (loggedIn) { // render the logout button <button onClick={onLogoutClick}>Logout</button>} else { <button onClick={login}>Login</button>}And then we can write the logout function and attach it to the button.
We also recommend calling ditto.auth.logout with a callback function that
evicts any data from the local database.
function onLogoutClick() { ditto.auth.logout(() => { ditto.store.collection('cars').findAll().evict() }) await auth0.logout({ returnTo: window.location.origin })}Assuming you have a login button in your SwiftUI ContentView, we want to create
a new ObservedObject that we can subscribe to for updates to the
authentication status.
class ProfileViewModel: ObservableObject {  // your authentication code will go here}
struct ContentView: View {    @ObservedObject var viewModel: ProfileViewModel = ProfileViewModel()
var body: some View { Button("Login").padding() }}We attach a login function to the button
class ProfileViewModel: ObservableObject {  let credentialsManager = CredentialsManager(authentication: Auth0.authentication())
  func login () {      Auth0          .webAuth()          .scope("openid profile")          .audience("https://ENTER_YOUR_SCOPE_URL_HERE.auth0.com/userinfo")          .start { result in              switch result {              case .success(let credentials):                  print("Obtained credentials: \(credentials)")                  self.credentialsManager.store(credentials: credentials)                  self.startDitto()              case .failure(let error):                  print("Failed with: \(error)")                  // Handle Error              }          }  }}
struct ContentView: View {    @ObservedObject var viewModel: ProfileViewModel = ProfileViewModel()
var body: some View { Button("Login", action: viewModel.login).padding() }}We can then create a startDitto function that:
- Gets the access token from Auth0;
- Starts the Ditto instance; and
- Creates a liveQuery
info
The provider name given to the Ditto Client must match a provider name in the Portal (e.g., replit-auth).
class ProfileViewModel: ObservableObject {    @Published var ditto: Ditto?    @Published var docs: [DittoDocument] = []    ....
func startDitto () { // 1. Get the access token from Auth0 credentialsManager.credentials { error, credentials in guard error == nil, let credentials = credentials else { // Handle error return } guard let accessToken = credentials.accessToken else { // Handle Error return } self.authDelegate = AuthDelegate(token: accessToken) // 2. Start the Ditto instance let identity = DittoIdentity.onlineWithAuthentication( appID: "YOUR_APP_ID_HERE", authenticationDelegate: self.authDelegate ) let ditto = Ditto(identity: identity) try! ditto.startSync() // 3. Create a liveQuery self.ditto = ditto let subscription = ditto.store.collection("cars").find("state == 'FOR_SALE'").subscribe() let liveQuery = ditto.store.collection("cars").find("name == 'Toyota'").observeLocal { docs, event in self.docs = docs } } }} To pass the token to your server route you created in the previous section, you
need to create an AuthDelegate class that is passed to the Ditto constructor:
class AuthDelegate: DittoAuthenticationDelegate { var token: String init (token: String) { self.token = token } func authenticationRequired(authenticator: DittoAuthenticator) { authenticator.login(self.token, provider: "replit-auth") { clientInfo, err in print("Login request completed. Error? \(err)") } } func authenticationExpiringSoon(authenticator: DittoAuthenticator, secondsRemaining: Int64) { print("Auth token expiring in \(secondsRemaining)") authenticator.login(self.token, provider: "replit-auth") { clientInfo, err in print("Login request completed. Error? \(err)") } }}Our ContentView can now display the number of cars, and you can add a button for adding an item to the database:
struct ContentView: View { @ObservedObject var viewModel: ProfileViewModel = ProfileViewModel() var body: some View { Button("Login", action: viewModel.login) .padding() Text("Cars:" + String(viewModel.docs.count)) // Bonus points: implement addItem button using Ditto's `upsert` Button("+1", viewModel.addItem) }}
Log out
class ProfileViewModel: ObservableObject {  @Published private(set) var state = State.isLoading
  enum State {      case isLoading      case loaded(UserInfo)  }
}
struct ContentView: View { @ObservedObject var viewModel: ProfileViewModel = ProfileViewModel() var body: some View { switch viewModel.state { case .isLoading: Button("Login", action: viewModel.login) case .loaded(let user): Text(user.name ?? "Anonymous Ditto User") Button("Logout", action: viewModel.logout) } Text("Cars:" + String(viewModel.docs.count)) }}And then we can write the logout function and attach it to the button.
We also recommend calling ditto.auth.logout with a callback function that
evicts any data from the local database.
class ProfileViewModel: ObservableObject {  ...
  func logout () {      Auth0          .webAuth()          .clearSession(federated: false) { result in              if result {                  if (self.ditto != nil) {                    // Clean up the cars collection after logout                      self.ditto!.auth?.logout(cleanup: { ditto in                          ditto.store.collection("cars").findAll().evict()                      })                  }                  self.state = State.isLoading              }          }  }  }
What you'll need
- An Android development setup. Make sure you have the following, in the order given below:
- Java SE Developer Kit (JDK), version 11 or later. You can find out which version is on your computer by opening a command-line interface and entering
java --version. - Android Studio, version 3.6 (February 2020) or later. The current stable version of Android Studio was used when writing this article: version 2022.2.1 Patch 1, also known as "Flamingo".
- At least one Android SDK (Software Development Kit) platform. You can confirm that you have one (and install one if you don't) in Android Studio. Open Tools -> SDK Manager. You'll see a list of Android SDK platforms. Make sure that the current SDK (Android 13.0 (Tiramisu) at the time of writing) is checked; if it isn't, check it, click the Apply button, and click the OK button in the confirmation dialog that appears. Wait for the SDK platform to install and click the Finish button when installation is complete.
- Java SE Developer Kit (JDK), version 11 or later. You can find out which version is on your computer by opening a command-line interface and entering
- An Android device, real or virtual.
- An Auth0 account. You can sign up for a free one now, or later.
What might be useful
- This article assumes you are familiar with Android development. If you're new to Android development or the Kotlin programming language, you might find Android Basics in Kotlin a good introduction.
Make a note of the value that Android Studio generates in the Package Name
field. You'll need it when registering the app with Auth0. If you're adding
authentication to an existing Android project, you may find the package name in
various places, such as the root tag of your Manifest file or in your app
Gradle file (applicationId).
info
API 21, which dates back to November 2014, is the oldest version of Android supported by Auth0.
In your app Gradle file add the following line to the defaultConfig block of the file:
manifestPlaceholders = [auth0Domain: "@string/com_auth0_domain", auth0Scheme: "@string/com_auth0_scheme"]This is where you are accessing the string resources you stored earlier.
Add the necessary dependencies to your build.gradle file:
dependencies { implementation("com.auth0.android:auth0:2.8.0") // Auth0 SDK implementation("live.ditto:ditto:4.1.0") // Ditto SDK}Here's an example of a login function you might call from within your Android code:
// Login/logout-related properties    private lateinit var account: Auth0    private var cachedCredentials: Credentials? = null    private var cachedUserProfile: UserProfile? = null
override fun onCreate(savedInstanceState: Bundle?) { ...account: represents the app's Auth0 account and is instantiated using the app's client ID and the domain for the app's Auth0 tenant. Let me make this clear: this isn't the account of the user trying to log in, but the account of the developer or organization who is delegating the login/logout process to Auth0. In the case of this example, it's your Auth0 developer account.account's value is set inonCreate()when the activity is instantiated.cachedCredentials: contains the user's credentials that are returned from Auth0 after a successful login. Its value should benullwhen the user is not logged in. When the user is logged in, it should reference an instance ofCredentials. ACredentialsinstance has the following properties:idToken: The [ID token], which contains user information that the app can use to customize the user's experience.accessToken: The [access token], which is a credential that allows the app to access the Auth0 API.refreshToken: The [refresh token], which can be used to request a new access token when the original access token expires, without requiring the user to re-authenticate.type: The type of the received access token.expiresAt: The date/time when the received access token expires.scope: The scopes granted to the access token. I'll explain what scopes are in the next section, The login method.
cachedUserProfile: holds the user's profile information. Its value should benullwhen the user is not logged in. When the user is logged in, it should reference an instance ofUserProfile. AUserProfileinstance has the following properties:email: The email address corresponding to the user account.isEmailVerified:trueif the user responded to the verification email sent by Auth0 after they registered themselves as a user.name: The user's full name.givenName: The user's given name, often referred to as their "first name " or "forename ".familyName: The user's family name, often referred to as their "last name " or "surname ".nickname: The user's nickname, sometimes referred to as thier "familiar name " or "moniker ".PictureURL: The URL where the user's picture can be retrieved.createdAt: The creation date and time of the user's account.
Initialize Auth0 in your application's onCreate method:
override fun onCreate(savedInstanceState: Bundle?) { super.onCreate(savedInstanceState)
override fun onCreate(savedInstanceState: Bundle?) {    super.onCreate(savedInstanceState)
    account = Auth0(        getString(R.string.com_auth0_client_id),        getString(R.string.com_auth0_domain)    )
    binding = ActivityMainBinding.inflate(layoutInflater)    setContentView(binding.root)
binding.buttonLogin.setOnClickListener { login() } binding.buttonLogout.setOnClickListener { logout() } binding.buttonGet.setOnClickListener { getUserMetadata() } binding.buttonSet.setOnClickListener { setUserMetadata() }}This method:
- Defines the account object, which contains the necessary credentials to connect to your Auth0 account.
- Creates a view binding object, which you'll use to access the onscreen widgets.
- Connects the Log in, Log out, Get, and Set buttons to the methods they should call when tapped.
Add the login() method
The next step is to implement the method that gets called when the user taps the Log In button.
Implement the Auth0 login flow in your application. Here is an example:
private fun login() {    WebAuthProvider        .login(account)        .withScheme(getString(R.string.com_auth0_scheme))        .withScope(getString(R.string.login_scopes))        .withAudience(getString(R.string.login_audience, getString(R.string.com_auth0_domain)))        .start(this, object : Callback<Credentials, AuthenticationException> {
            override fun onFailure(exception: AuthenticationException) {                showSnackBar(getString(R.string.login_failure_message, exception.getCode()))            }
override fun onSuccess(credentials: Credentials) { cachedCredentials = credentials showSnackBar(getString(R.string.login_success_message, credentials.accessToken)) updateUI() showUserProfile() } })}login() uses the Auth0 SDK's WebAuthProvider class, which gives the app the ability to use Auth0's authentication service. The WebAuthProvider methods that you'll use most often are its login() and logout() methods.
To summarize, the Builder signature for WebAuthProvider looks like this:
WebAuthProvider .login() .withScheme() .withScope() .withAudience() .start()Add the logout() method
private fun login() {    WebAuthProvider        .login(account)        .withScheme(getString(R.string.com_auth0_scheme))        .withScope(getString(R.string.login_scopes))        .withAudience(getString(R.string.login_audience, getString(R.string.com_auth0_domain)))        .start(this, object : Callback<Credentials, AuthenticationException> {
            override fun onFailure(exception: AuthenticationException) {                showSnackBar(getString(R.string.login_failure_message, exception.getCode()))            }
override fun onSuccess(credentials: Credentials) { cachedCredentials = credentials showSnackBar(getString(R.string.login_success_message, credentials.accessToken)) updateUI() showUserProfile() } })}As with login(), logout() also uses the Auth0 SDK's WebAuthProvider class and is a one-liner that uses the Builder pattern. This time, that one line calls a shorter chain of WebAuthProvider 's methods starting with logout().
To summarize, the Builder signature looks like this:
WebAuthProvider .logout() .withScheme() .start()Add the showUserProfile() method
Every Auth0 user has a user profile associated with their account. The user profile contains the following basic information about the user:
- Names: The user's full name, given name, surname, and nickname
- Email info: The user's email address, and whether it was verified
- Picture: The location of an image that identifies the user
- Creation date: The date and time when the user's account was created
You can also retrieve additional metadata about the user; for more details see the official Auth0 documentation and guides.
private fun showUserProfile() {    // Guard against showing the profile when no user is logged in    if (cachedCredentials == null) {        return    }
    val client = AuthenticationAPIClient(account)    client        .userInfo(cachedCredentials?.accessToken)        .start(object : Callback<UserProfile, AuthenticationException> {
            override fun onFailure(exception: AuthenticationException) {                showSnackBar(getString(R.string.general_failure_with_exception_code,                    exception.getCode()))            }
            override fun onSuccess(profile: UserProfile) {                cachedUserProfile = profile                updateUI()            }
})}Earlier in the documentation you saw how to login using a token. You might have stored such a token in your app after an initial successful login by the user using username and password, or one of the other built-in methods provided through Auth0. To re-iterate from earlier:
fun login() { ditto.auth?.login(cachedCredentials?.accessToken, BuildConfig.DITTO_AUTH_PROVIDER) { clientInfo, err -> println("Login request completed. Error? $err") }}Now you can pass in the token you retrieve from Auth0, here.
Note it's recommended to evict any data from the local database as cleanup from the ditto.auth.logout function.
Ideally, you are following architectural best practices. You will likely have the login and logout functions defined in a Repository and access them only from your ViewModel, and your UI code will in turn call functions on the ViewModel. If you are using Compose and MVI, in your ViewModel you might define a LiveData, or better yet, a StateFlow for your UI Composables to then listen for changes in the authentication status.
Tying all of this together, your Ditto startup will look like this:
info
The provider name given to the Ditto Client must match a provider name in the Portal (e.g., replit-auth).
private fun setupDitto() {    val androidDependencies = DefaultAndroidDittoDependencies(this)    DittoLogger.minimumLogLevel = DittoLogLevel.DEBUG    dittoAuthCallback = AuthCallback()    ditto = Ditto(      androidDependencies,      DittoIdentity.OnlineWithAuthentication(        androidDependencies,        BuildConfig.DITTO_APP_ID,        dittoAuthCallback,        true      )    )    ditto.startSync()  }
class AuthCallback: DittoAuthenticationCallback {    override fun authenticationRequired(authenticator: DittoAuthenticator) {        authenticator.login(cachedCredentials?.accessToken, BuildConfig.DITTO_AUTH_PROVIDER) { clientInfo, err ->            println("Login request completed. Error? $err")        }    }
override fun authenticationExpiringSoon( authenticator: DittoAuthenticator, secondsRemaining: Long ) { authenticator.login(cachedCredentials?.accessToken, BuildConfig.DITTO_AUTH_PROVIDER) { clientInfo, err -> println("Login request completed. Error? $err") } }}Note that it's critical not only for your Ditto instance to be a singleton that
remains in scope for the entire Application lifecycle, but also your
DittoAuthenticationCallback must also remain in scope. Otherwise, if either of
them are garbage collected it will lead to undesirable results.
Conclusion
In this tutorial, we have seen how to integrate Auth0 with Ditto in a Kotlin-based Android application. By following the steps outlined here, you can add secure and scalable authentication to your application.
To make this usable for real-world applications, you can retrieve the user's profile details such as email, username, and full name. See the official Auth0 documentation for your platform to add that functionality to your application
🎉 Yay! You now have a fully functioning onlineWithAuthentication app. Build and
run it on a device.
For a full application example, see the example application on GitHub
Server
The authentication webhook needs to handle an HTTP POST request. Each client that will need to authenticate will send a payload to this webhook. The following section requires that you have knowledge of writing server side HTTP endpoints and responding with a JSON payload. Code samples of server side code are written with a NodeJS / Express syntax. You can use any language or framework on the server side.
Incoming POST body
When your client device wants to authenticate using your webhook, your server will receive an HTTP post with a JSON payload that looks like:
{ "appID": "YOUR_APP_ID_HERE", // the appID "provider": "my-auth", // this is the "Name" of the "Authentication Webhook" "token": "eyJhbGciOiJI..." // this is what each device will send to authenticate}Your can introspect these values by parsing out the request body:
let express = require('express')let cors = require('cors')let body = require('body-parser')let app = express()
app.use(cors())app.use(body.json())
let app = express()
app.post('/', (req, res) => { const appID = req.body.appID const provider = req.body.provider const token = req.body.token})Generally, you will want to check the token for some sort of validity. Let's assume you have some sort of library or logic to parse and validate the token is for a specific user.
You can also use the clientInfo key in your JSON response to
pass information back to client.
app.post('/', async (req, res) => { const token = req.body.token; try { // The token that your server receives from ditto is always a string let parsedToken = JSON.parse(token) let payload = getDittoPermissions(parsedToken) res.json(payload) } catch (err) { res.json({ "authenticate": err, "clientInfo": err.message }) }})As a simple example, let's grant full read & write permissions to all
collections and all documents.
app.post('/', async (req, res) => { const token = req.body.token; try { let payload = { "authenticate": true, "expirationSeconds": 28800, "userID": "123abc", "permissions": { "read": { "everything": true, "queriesByCollection": {} }, "write": { "everything": true, "queriesByCollection": {} } } } res.json(payload) } catch (err) { res.json({ "authenticate": err, "clientInfo": err.message }) }})For more information on how to design your app's permissions, see Access Control Permissions.
Deploy your server
Now, the portal will attempt to reach this server. That means you must deploy it somewhere that this HTTP request is accessible. For testing, you can use a quick-deploy service such as Glitch.
info
Please be sure that this endpoint is not behind a firewall or VPN. If you cannot get around this requirement contact us.
app.listen(process.env.PORT, () => { console.log('server listening on ', process.env.PORT)})